
Fire up your creativity and get ready to stack up some seriously fun handmade cards, because this blog is saucy, grilled to perfection, and loaded with crafty goodness! We’re talking bold colors, rich textures, and the kind of layering that would make any burger-loving crafter say, “Lettuce do this!” 🥬🔥
But first—story time.
This whole thing started with a scrapbook layout. One BIG, BBQ-inspired 12x12 DISASTER that had me questioning all my paper-crafting skills. You know those projects where you think you have a vision, but halfway through, it looks like a tornado hit your craft room? Yeah… that.
But after finally pulling that page together (miraculously), I looked at my craft table and saw a mountain of scraps staring back at me. And let’s be real—we don’t waste good cardstock around here!
💡 Enter the Bistro Burger Stamp & Die Bundle. That’s when the real lightbulb moment hit—if my scrapbook page was trying to give “backyard BBQ vibes,” why not turn those leftover scraps into handmade cards that are just as fun, flavorful, and totally stacked with creativity?
And that’s exactly what I did.
🔥🍟 FROM SCRAPBOOK FLOP TO DELICIOUS: CRAFTING HANDMADE CARDS WITH THE BISTRO BURGER BUNDLE! 🍟🔥
Ever had a project that was so tragic it somehow inspired something better? Nope? Me neither—until NOW.

✔ First, I built my scrapbook layout—stacked with woodgrain textures, bold reds, and mouthwatering burger vibes.
✔ Then, I realized my leftover scraps were perfect for layering onto handmade cards.
✔ Finally, I grabbed my Bistro Burger Bundle, cut out some burgers, stamped a few fun sentiments, and BOOM—a full set of playful, foodie-themed cards was born!
🔥 Moral of the story? Never let your crafting leftovers go to waste—they might just be the secret ingredient to your next great design!!
🛠️ CRAFTING WITH SCRAPS: THE BEST SIDE DISH TO ANY PROJECT!


Since this whole project started from my scrapbook layout, I kept the theme going by using up every last scrap!
✨ Materials I Used:
✔ Country Woods DSP – Because nothing says backyard BBQ like a woodgrain backdrop!
✔ CTMH Enjoy the Ride – Adding a little extra vintage charm!
✔ Basic White Cardstock – For crisp, clean stamping!
✔ Bistro Burger Stamp & Die Bundle – The star of the show!
✔ Industrial Trinkets - For a little sparkle
🎨 COLORING BREAKDOWN (STAMPIN’ BLENDS):


🥩 Pecan Pie – The perfect meaty shade!
🧀 Daffodil Delight – Gooey, melted cheese vibes!
🍞 Bronze & Ivory – Golden-toasted burger buns!
🍅 Poppy Parade – Juicy tomato goodness!
🥬 Granny Apple Green – Crisp lettuce & pickles!
🔥 This card has all the makings of a perfect summer day—warm textures, bold colors, and a little handmade sparkle! Pass the ketchup!
🍔 WHAT’S INSIDE THE BISTRO BURGER BUNDLE?


The Bistro Burger Stamp & Die Bundle is THE ultimate recipe for paper-crafting deliciousness!
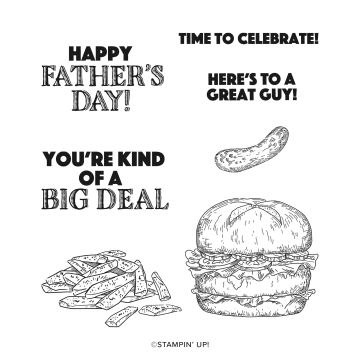
✨ Bistro Burger Stamp Set – Featuring juicy burgers, crispy fries, condiments, and pun-tastic sentiments!
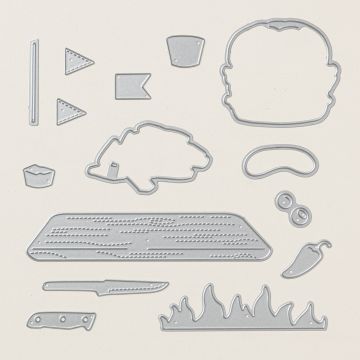
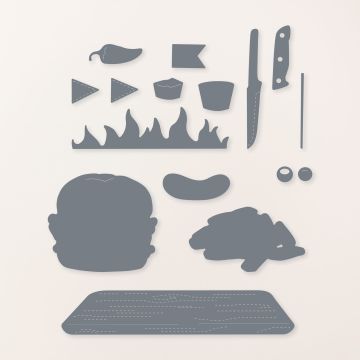
✨ Bistro Burger Dies – Cut out every delicious detail for dimensional, layered creations!
💡 Pro Tip: You can even mix and match different cardstock colors to create custom burger toppings! Want a spicy jalapeño burger? Grab some Shaded Spruce! Need extra melted cheese? Daffodil Delight’s got you covered!
🎉 CREATIVE WAYS TO USE THE BISTRO BURGER BUNDLE!
Just like your favorite burger joint, this set serves up unlimited options! Here are just a few ways to put it to work:

🍔 Father’s Day – Because dads + grilling = a match made in BBQ heaven!
🎂 Birthdays – Perfect for any foodie in your life! (Bonus points if they love a good pun!)
🏆 Congratulations – Stack up a “well done” card for someone who just nailed a big achievement!
💌 Thinking of You – A little “lettuce catch-up” note is guaranteed to bring smiles!
🎊 BBQ Invitations – Why buy generic invites when you can create your own personalized BBQ party invitations?!
🍟 Double the Burger, Double the Fun! 🍔🍔 These deliciously crafty burgers are layered with love and a pinch of paper-crafting genius!
👨👩👧👦 Bistro Burgers - The Perfect Family Crafting Activity!
Crafting is always more fun with friends and family! The Bistro Burger Bundle is perfect for a family handmade cards crafting night—here’s why:
🎶 Set the mood with a backyard BBQ playlist! (Throw on some summer hits!)
✂ Let kids build their own burger cards! (No wrong way to stack a burger!)
🖌 Mix and match toppings to create totally custom designs!
🔥 Fun Idea: Have each family member design their dream burger on a card—then vote on the most creative one!
📌 EXPLORE MORE HANDMADE FOOD-THEMED CARD & SCRAPBOOKING INSPIRATION!
Love this project? Sink your teeth into more paper crafting fun!


📸 SHARE YOUR BURGERLICIOUS CREATIONS!
I CANNOT WAIT to see what you create with the Bistro Burger Bundle! Whether it’s a card, a scrapbook layout, or a BBQ party invite, I’d love to see your take!
💥 FINAL THOUGHTS: SERVING UP HANDMADE FUN!

🔥 This sizzling handmade card is ready to impress! Whether it’s for Father’s Day, a birthday, or just a little foodie fun, this one’s a BIG DEAL!
The Bistro Burger Bundle is the perfect recipe for crafty fun—whether you’re using up scraps, designing handmade invitations, or creating a mouthwatering scrapbook spread!
✔ Scrap-busting creativity – because no paper should go to waste!
✔ Fun for the whole family – everyone can build their own burger card!
✔ Endless versatility – cards, invites, scrapbook pages & more!
So fire up your Cricut, grab your Stampin’ Blends, and let’s craft some burger magic! 🍔✨
💥 Until next time—keep stacking, keep stamping, and keep crafting with love! 💥
💖 April – This Chick Loves Paper
🛒 Grab Your Supplies & Start Crafting!
📸 All photos are subject to copyright
Images © Stampin’ Up!
✏ Disclaimer: The content in this blog is the sole responsibility of April Raine - This Chick Loves Paper as a Stampin’ Up!® Independent Demonstrator. The use of and content of classes, services, or products offered is not endorsed by Stampin’ Up!®
🔥 Fire up your creativity with the Stampin’ Up!® Bistro Burger Bundle! 🍔✨ This handmade card tutorial is stacked with bold colors, layered textures, and deliciously fun designs inspired by backyard BBQs! Learn how to turn your paper scraps into mouthwatering creations with burgers, fries, and pun-tastic sentiments. Get inspired and craft your own Bistro Burger cards with this fun, step-by-step guide from This Chick Loves Paper!
Comments